
Installing, Setup, and Updating Grammarian PRO3 X
Topic:
 1. Grammarian PRO3 X: Installing and Updating 2. Grammarian PRO3 X: macOS Grammar/Spelling Service 3. Setting up Grammarian's Integrated Interactive Checking, AutoCorrect, and AutoType 4. Grammarian PRO3 X: Granting Security Permissions When Installing 5. Grammarian PRO3 X: Granting Security Permissions from Security application 6. Activation and Registration Procedure; Entering your Purchased Activation Code 7. Adding Spelling Dictionaries
Installing and Updating Grammarian PRO3 X
---- INSTALLING GRAMMARIAN PRO3 X
Let’s install a new Grammarian PRO3 X. If you need help during the process, click on the help button (?) on the left side of the window.
Grammarian PRO3 X install step 1
1) From your downloaded GrammarianPRO3X.dmg, drag the Grammarian PRO3 X folder over to the Applications folder on your macOS drive. (Do not move the Grammarian app outside of the folder.)
Grammarian PRO3 X install step 2
2) Run the Grammarian application (identified with a checkmark icon) that is inside the Grammarian PRO3 X folder. Grammarian will ask you to install an Input menu. Click "OK". Grammarian will then start the install process.
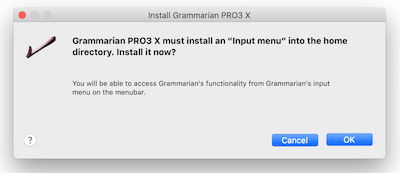
Figure 1
Then, Grammarian will tell you that it successfully installed the input Menu. You will see the following window if you are on:
macOS 12 or later (Monterey or later)
Grant Input Menu Security. The system will open the System Preferences/Keyboard/Input Sources list and prompt to allow the new third-party input method (Grammarian). Click "OK" to allow Grammarian's input menu to be used.
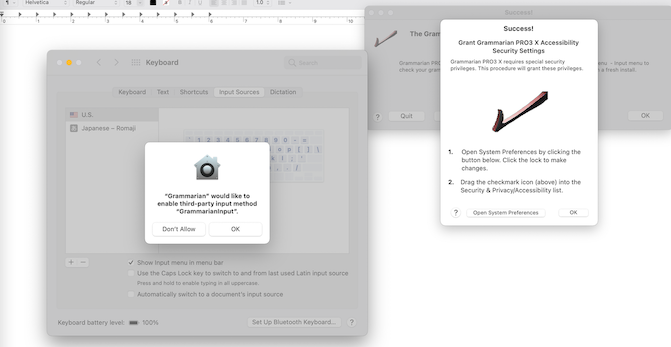
Figure 2
Note: If a Grammarian item is listed in the System Preferences/Keyboard/Input Sources list but not present in the flag menu, you must delete the item from the Input Sources list and re-add it for it to show up in the flag menu.
See FAQ: Monterey 12.x: The Grammarian menu does not show up after installation.
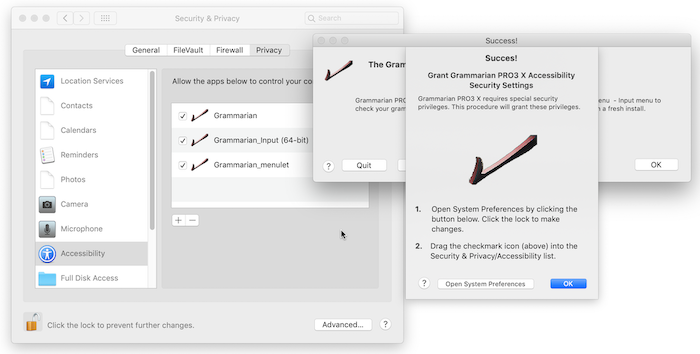
Grant Security Permissions. Next, you can follow the Granting Security Permissions instructions below. After you have granted the security permissions, click "OK".
macOS 10.14 or later
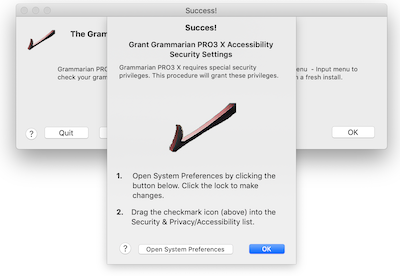
Figure 2
Grant Security Permissions. You can follow the Granting Security Permissions instructions below. After you have granted the security permissions, click "OK".
macOS 10.13 or earlier
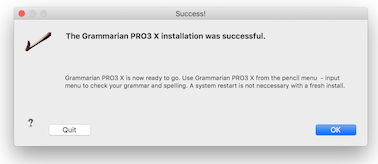
Figure 3
3) To finish the installation, click "OK" or "Quit". If Grammarian detects that the system should be reset, Grammarian will display "Log Out" and "Restart" buttons. Click one of these to restart the system.
4) Now, look for a brown checkmark icon menu and a Pencil icon menu (Pencil menu) on the right side of the top menu bar. The Pencil Menu is Grammarian’s menu:

Figure 4
You are ready to use Grammarian PRO3 X.
Install Note #1: If you are moving from Grammarian PRO2 X to Grammarian PRO3 X, all you will need to do is to replace the Grammarian PRO2 X folder with the new Grammarian PRO3 X folder. Grammarian PRO3 X will upgrade all support files automatically when it runs. Most of the old settings will remain intact.
Install Note #2: If you have problems with the installation, you can start over by running the Grammarian PRO3 Uninstaller in the Uninstaller-Grammarian PRO3 X folder. Select option #2 and click the Uninstall button. Then quit the Uninstaller. Make sure the Grammarian app is quit. Then run the Grammarian app again. The Grammarian app will next ask to install a new input menu.
How to set up Grammarian PRO3's Interactive Checking settings:
- Set up Grammarian PRO3's macOS Grammar/Spelling Service
- Set up Grammarian PRO3's Integrated Interactive Checking
Next, learn how to Check Documents.
Grammarian PRO3 X: macOS Grammar/Spelling Service
Using Grammarian PRO3 X with the macOS Grammar/Spelling Service Panel
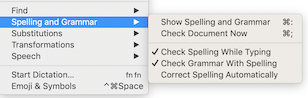
Grammarian PRO3 X integrates fully with the standard macOS Grammar/Spelling Service Panel and is available in most macOS applications from the Spelling and Grammar menu item in the Edit menu. The Grammarian PRO3 X service detects spelling, grammar, and punctuation errors. Spelling errors underline in RED, and grammar and punctuation errors underline in GREEN.
Using Grammarian PRO3 X with the Grammar/Spelling Service Panel is identical to using Apple’s built-in spelling services. However, Grammarian PRO3 X has much more error catching capability and functionality.
The Grammar/Spelling Service together with Grammarian's Integrated Interactive Checking extend perfect control over editing.
Note: Obviously, the Grammarian PRO3 spelling/grammar service works only in apps that support the macOS system spelling/grammar service. Almost all Mac apps support it. The apps that support the service will have the macOS Spelling and Grammar menu in the Edit menu:
* This is a spelling/grammar service (also for Grammarian's service) how-to for Checking spelling and grammar automatically in emails on the Mac
Setting up the Grammar/Spelling Service Panel with Grammarian PRO3 X
On your Mac, choose Apple menu ![]() > System Preferences. Click Keyboard, then click Text.
Do the following:
Click the Spelling popup menu, then choose the English (Grammarian) service:
> System Preferences. Click Keyboard, then click Text.
Do the following:
Click the Spelling popup menu, then choose the English (Grammarian) service:
Note: In some macOS versions (notably Catalina, macOS 10.15), we have found with our testing that the macOS spelling/grammar service settings will sometimes not take effect until a reboot is issued. If the system does not update the action for you, try this after the Grammarian PRO3 X installation. The settings should stick thereafter.
▪ Check spelling, grammar, and punctuation:
▪ Or right-click an underlined error to see the suggestions for an underlined word or phrase:
Setting up Grammarian's Integrated Interactive Checking, AutoCorrect, and AutoType
Grammarian's Integrated Interactive Checking provides the automatic popup menu and spoken sounds that announce the error. Grammarian's Integrated functionality includes Grammar, Spelling, AutoCorrect, and AutoType.
The settings for Integrated Interactive Checking are per application. Grammarian remembers the settings for each running app and automatically switches to the settings per context. The settings are accessible from the Pencil Menu/Interactive Checking menu as shown:
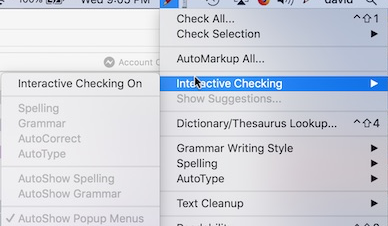
You must turn on each setting for the current app. If you would want AutoCorrect and AutoType for Apple Mail, you would turn on the settings like this:


Granting Security Permissions When Installing
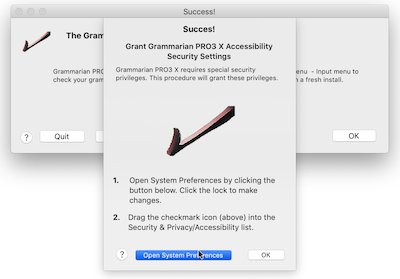
1. If the “Grammarian PRO3 Security Setup” window opens after the input Menu is successfully installed, click the “Open System Preferences” button to open the System Preferences/Accessibility pane:
2. Then drag the checkmark icon item (shown below) into the Accessibility list:
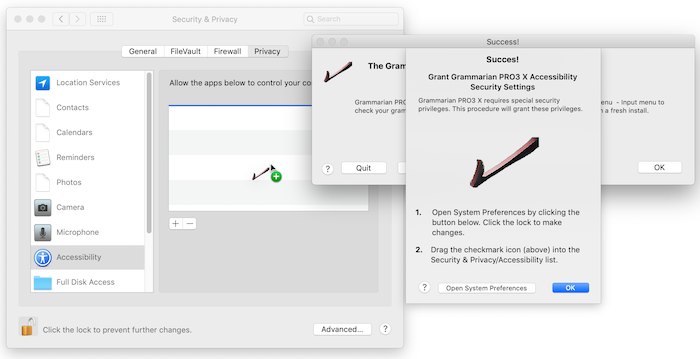
3. The following Grammarian items are installed into the list (note: if the Grammarian items are already in the list, go ahead anyway):
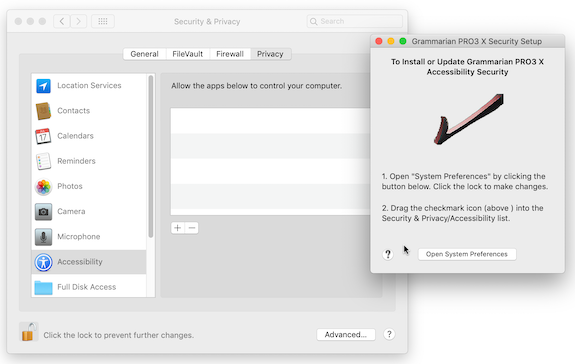
Granting Security Permissions with the included "Grammarian Security Setup” utility application
This quick procedure installs the Grammarian PRO3 X accessibility security items. This procedure is also for resetting the accessibility settings. Toggling the settings ON/OFF also resets the settings for updates. If Grammarian’s paste changes stop working or Interactive Checking does not make changes, use this procedure to force the system to update the accessibility settings. This applies to macOS Mojave 10.14 and higher.
1. Run the “Grammarian Security Setup” application in the “Install & Update- Accessibility Security” folder. This will open the “Grammarian PRO3 Security Setup” window. Click “Open System Preferences” button to open the System Preferences/Accessibility pane:
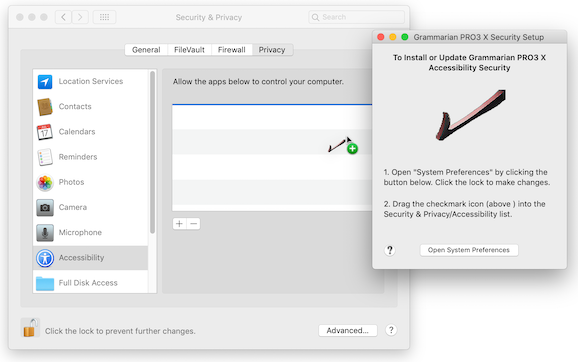
2. Then drag the checkmark icon item (shown below) into the Accessibility list:
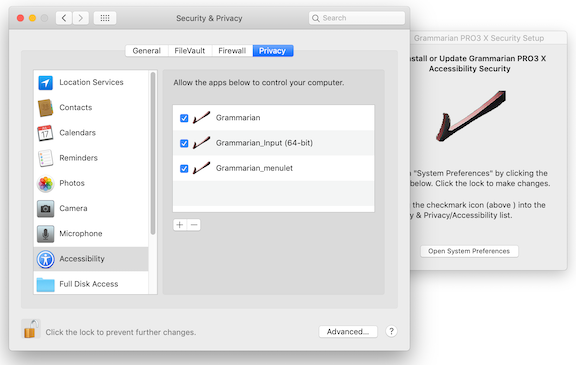
3. The following Grammarian items are installed into the list:
Activation and Registration Procedure; Entering your Purchased Activation Code
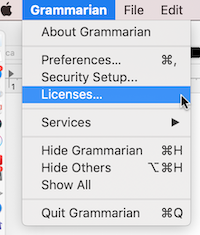
1. To activate Grammarian PRO3 X, select Licenses under the Application menu to open the Licenses Activation/Registration window as shown below:
2. In the Licenses Activation/Registration window and in the field labeled "Owner Name:", enter your name. And in the field labeled "Activation Code:", enter the PRO3 Activation ID Code from the support receipt. In the field labeled "Email Address:", enter your email address. Then, click the Register License button as shown:

How to set up Grammarian PRO3 X to spell and grammar check before sending email in Apple Mail
First, make sure that Grammarian is the current service as described here.
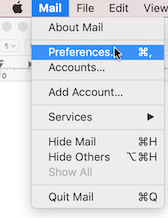
Click the Mail app icon and select Preferences from the menu list:
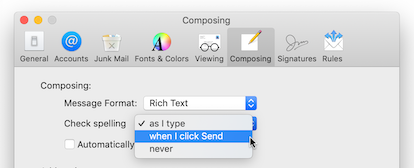
In the "Composing" Preferences, navigate to "Composing" and select "when I click Send" in the "Check spelling" drop down. This would enable spell check before sending email in Mail App:
Adding spelling dictionaries
Open the Writing Rules/Spelling pane. Drag and drop the dictionary (from the download disk) into the Spelling Dictionaries list: