|
Please follow this exactly step-by-step. If you get lost, please reread the step until it makes sense. If you don’t understand
something or you get hung up, e-mail us. It may help to print this out or copy the text into another program so that it is
easier to view. So, let’s get started.
---- INSTALLING GRAMMARIAN PRO3 X
Now, let’s install a new Grammarian PRO3 X.
 1) From your downloaded GrammarianPRO2X.dmg (or Grammarian PRO2 backup disk), drag the Grammarian PRO2 X folder over to the
Applications folder on your OS X drive. 1) From your downloaded GrammarianPRO2X.dmg (or Grammarian PRO2 backup disk), drag the Grammarian PRO2 X folder over to the
Applications folder on your OS X drive.
 2) Run the Grammarian application (identified with a checkmark icon). Grammarian will ask you to install an Input Menu. Click "OK". Grammarian will start the install process. 2) Run the Grammarian application (identified with a checkmark icon). Grammarian will ask you to install an Input Menu. Click "OK". Grammarian will start the install process.
Then, Grammarian will tell you that it successfully installed the Input Menu and
will ask you to log out or restart.
 3) Now, click Log Out or Restart. 3) Now, click Log Out or Restart.
 4) After the computer logs in or reboots, look for a Checkmark icon menu and a Pencil icon menu (Pencil Menu) on the right side of the top menu bar. The Pencil Menu is Grammarian’s menu: 4) After the computer logs in or reboots, look for a Checkmark icon menu and a Pencil icon menu (Pencil Menu) on the right side of the top menu bar. The Pencil Menu is Grammarian’s menu:
 6) If you do not see a a Checkmark icon menu and a Pencil icon menu, look for a flag menu on the right side of the top menu bar. Go up to the flag icon (on menu bar) and click on it. Do you see an item named "Grammarian"? Select the Grammarian (Input Menu)
item. 6) If you do not see a a Checkmark icon menu and a Pencil icon menu, look for a flag menu on the right side of the top menu bar. Go up to the flag icon (on menu bar) and click on it. Do you see an item named "Grammarian"? Select the Grammarian (Input Menu)
item.

 7) Grammarian should now be activated, and the flag icon turns into a reddish-brown check mark icon. A pencil
should appear on the menu bar. The pencil is Grammarian’s menu. Click on the pencil icon (pencil menu). This displays all of Grammarian’s
functions. That’s it. You’ve done it! 7) Grammarian should now be activated, and the flag icon turns into a reddish-brown check mark icon. A pencil
should appear on the menu bar. The pencil is Grammarian’s menu. Click on the pencil icon (pencil menu). This displays all of Grammarian’s
functions. That’s it. You’ve done it!
Now, how to check my document?
Need help? Email: tech support
The Grammarian PRO3 X Input Menu:
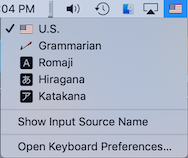
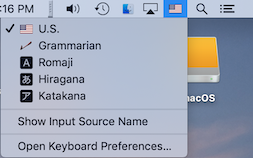
 1) The Flag/Checkmark menu is the System Input Menu and is on the right side of the top menu bar. You can turn Grammarian PRO3 X on/off from this menu as shown: 1) The Flag/Checkmark menu is the System Input Menu and is on the right side of the top menu bar. You can turn Grammarian PRO3 X on/off from this menu as shown:

 2) If a flag menu is showing (no Checkmark menu), turn Grammarian ON by selecting the Grammarian menu item. 2) If a flag menu is showing (no Checkmark menu), turn Grammarian ON by selecting the Grammarian menu item.
LET’S CHECK SOME SPELLING AND GRAMMAR
 1) In the Grammarian™ X Documentation folder in the Grammarian PRO3 X folder
(Applications folder), double-click on the Sample Document.rtf document to open it into TextEdit. 1) In the Grammarian™ X Documentation folder in the Grammarian PRO3 X folder
(Applications folder), double-click on the Sample Document.rtf document to open it into TextEdit.
 2) Once the document is open, go to the Grammarian pencil menu and select "Check All...". 2) Once the document is open, go to the Grammarian pencil menu and select "Check All...".
 3) Grammarian now selects all your text and brings up a spelling/grammar check window. 3) Grammarian now selects all your text and brings up a spelling/grammar check window.
LET’S SET UP INTERACTIVE CHECKING - Spelling and Grammar check-as-you-type
Grammarian’s pencil menu will indicate a yellow color if interactive spell checking is on, a green color if interactive grammar
checking is on, and a yellow-green color if both are on. Grammarian remembers the interactive (check-as-you-type) settings for every running application and will switch/sync the settings automatically.
 1) Turn on interactive spell checking by selecting the Interactive Checking submenu and then
selecting the Spelling menu item. Grammarian’s pencil menu turns yellow. This indicates that interactive spell
checking is on. 1) Turn on interactive spell checking by selecting the Interactive Checking submenu and then
selecting the Spelling menu item. Grammarian’s pencil menu turns yellow. This indicates that interactive spell
checking is on.
 2) Next, select the Auto-Show Spelling item from this same menu. An underline marker on the
Grammarian menu indicates Auto-Show Spelling is on. 2) Next, select the Auto-Show Spelling item from this same menu. An underline marker on the
Grammarian menu indicates Auto-Show Spelling is on.
 3) Open a new untitled document in TextEdit and type a misspelled word such as "seef" into the document. The
interactive spelling popup menu automatically shows to make a correction. Press the command key and the number "1" key or double-click on the correction.. Grammarian
will retype the correct word "see". 3) Open a new untitled document in TextEdit and type a misspelled word such as "seef" into the document. The
interactive spelling popup menu automatically shows to make a correction. Press the command key and the number "1" key or double-click on the correction.. Grammarian
will retype the correct word "see".
 4) Set up interactive grammar checking in the same way. 4) Set up interactive grammar checking in the same way.
 5) You can use the ESC key to cancel the Grammarian popup menu display whenever you want to ignore Grammarian's suggestions. 5) You can use the ESC key to cancel the Grammarian popup menu display whenever you want to ignore Grammarian's suggestions.
ADDING SPELLING DICTIONARIES
Download extra spelling dictionaries from here. Open the Grammarian Writing Rules Spelling pane and drag the dictionary file into the Spelling Dictionaries list.
Spelling dictionaries are compatible with both Grammarian PRO3 X and Grammarian PRO2 X versions.
Sierra, El Capitan, and Mavericks Input Menu System Preferences
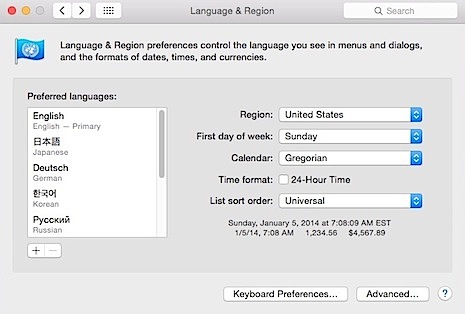
 1) Access the System Preferences Input Menu Preference setting by opening System Preferences/Language & Region and clicking Keyboard Preferences... 1) Access the System Preferences Input Menu Preference setting by opening System Preferences/Language & Region and clicking Keyboard Preferences...

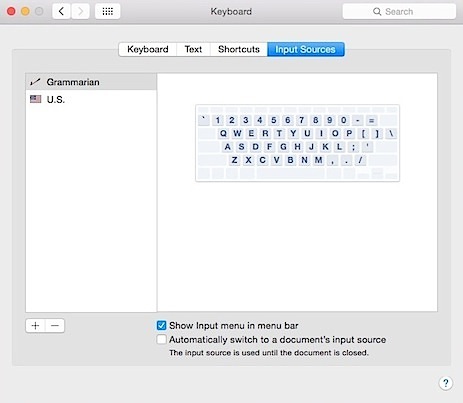
 2) The Keyboard pane will open. Select Input Sources tab. This shows the active Input Sources in the left hand list. Notice the flag and Grammarian items: 2) The Keyboard pane will open. Select Input Sources tab. This shows the active Input Sources in the left hand list. Notice the flag and Grammarian items:

 3) You can add Grammarian to this list if Grammarian's input menu is installed and not visible. Also verify that "Show Input menu in menu bar" checkbox is checked. 3) You can add Grammarian to this list if Grammarian's input menu is installed and not visible. Also verify that "Show Input menu in menu bar" checkbox is checked.
Snow Leopard Input Menu System Preferences:
 1) Open System Preferences from the Apple menu on the far
left-hand side of the menu bar. 1) Open System Preferences from the Apple menu on the far
left-hand side of the menu bar.
 2) After the System Preferences window opens, select the blue flag icon Language & Text (in Mac OS X 10.6.x -10.8.x) from the System Preferences panel. 2) After the System Preferences window opens, select the blue flag icon Language & Text (in Mac OS X 10.6.x -10.8.x) from the System Preferences panel.
 3) Select the Input Sources (in Mac OS X 10.6.x-10.8.x) panel tab. 3) Select the Input Sources (in Mac OS X 10.6.x-10.8.x) panel tab.
 4) Click the checkbox for "Show input menu in
menu bar" to ON meaning the checkbox has a check mark.
Now, look for the item called "Grammarian". It has a check mark icon in front of its name. You may have to scroll down the list
to see it. 4) Click the checkbox for "Show input menu in
menu bar" to ON meaning the checkbox has a check mark.
Now, look for the item called "Grammarian". It has a check mark icon in front of its name. You may have to scroll down the list
to see it.
 5) Click the checkbox for the Grammarian item to ON meaning the checkbox has a check mark. 5) Click the checkbox for the Grammarian item to ON meaning the checkbox has a check mark.
 6) A FLAG icon should now appear on the menu bar. The flag icon appears on the right side. See it? If a flag icon DOES NOT appear on the menu bar, try switching a couple of the other languages on/off by
clicking on their check boxes until you see a flag icon appear on the menu bar. Another shortcut trick reported to us by Joan
Mumbauer, a registered user, is: "After you check the Grammarian box and the 'Show input menu in menu bar', hit apple, option, and space bar. This automatically puts the pencil in the menu bar." 6) A FLAG icon should now appear on the menu bar. The flag icon appears on the right side. See it? If a flag icon DOES NOT appear on the menu bar, try switching a couple of the other languages on/off by
clicking on their check boxes until you see a flag icon appear on the menu bar. Another shortcut trick reported to us by Joan
Mumbauer, a registered user, is: "After you check the Grammarian box and the 'Show input menu in menu bar', hit apple, option, and space bar. This automatically puts the pencil in the menu bar."
Need help? Email: tech support |